Image formats
JPEG, PNG, WebP, AVIF, JPEG XL and SVG: what each is good at, and how to choose a quality setting. A photo and a screenshot encoded in every format to the same SSIMULACRA2 score, decoded in Chrome, Firefox and WebKit, loaded as an LCP image on a slow link, and an animated GIF turned into video.
- 01Choose a kind of fileLossy for photos, lossless for screenshots and line art, SVG for drawings, and video for animations.
- 02Compare formats fairlySave each format at the same measured quality, then compare the bytes, not the quality numbers.
- 03Ship new formats safelyOffer AVIF and JPEG XL in a
<picture>with a JPEG fallback, and pick a quality with a metric and your eyes.
One photo, five formats
Ravi looks after the Leaf and Kettle tea shop's website. He's getting the spring sale page ready. It needs a big photo at the top. A big photo like that is often called the hero.
When Ravi saves the photo, his photo editor asks two questions. Which format: JPEG, PNG, WebP, AVIF or JPEG XL? And what quality, on a slider from 1 to 100? Does his choice matter?
It matters to Asha. She'll open the page on her phone, on a slow link. The course saved the same photo as PNG and as AVIF. It made each one the hero, and loaded the page in Chrome 5 times each:
// The sale page's photo, saved two ways. Each time is the median of 5 loads, in ms.const asPng = { bytes: 747474, onScreen: 4212 };const asAvif = { bytes: 30149, onScreen: 628 }; console.log(`As PNG: ${asPng.bytes} bytes. The photo appeared at ${asPng.onScreen} ms.`);console.log(`As AVIF: ${asAvif.bytes} bytes. The photo appeared at ${asAvif.onScreen} ms.`);- Line 1 is a comment. Times are in milliseconds (ms), thousandths of a second. Each time is the median of the 5 loads. That's the middle one, once they're sorted from fastest to slowest.
- Lines 2 and 3 are the photo as PNG and as AVIF. Each holds the file's size in bytes, and when the photo appeared.
- Lines 5 and 6 print
As PNG: 747474 bytes. The photo appeared at 4212 ms.andAs AVIF: 30149 bytes. The photo appeared at 628 ms.
Same photo, same page, same link. Asha saw the AVIF 3,584 ms sooner, more than three and a half seconds. The photo is the largest thing on the page. So the moment it appears is the page's Largest Contentful Paint, or LCP. How LCP works showed how the browser times it.
So the format matters. That raises new questions. What did the AVIF leave out, to be about 25 times smaller? Would a JPEG have done as well? Can every browser show an AVIF? And where should the slider go?
Ravi has three more images to save. One is a screenshot of the sale's dashboard. One is the shop's logo. The last is a short animation that zooms into the photo. Each kind of image needs a different kind of file. Here is where the lesson ends up:
A fair race between formats
To find the best format, you have to compare files fairly. That's harder than it sounds. Each format has its own quality slider, and the numbers don't match.
Two brands of tea sit side by side on a shelf. One bag says "Large". The other says "Family size". The words tell you nothing, because each brand picks its own. So you put both bags on the shop's scale. Then you compare what you pay for the same 100 g.
- In real life: "Large" on one bag, "Family size" on the other
- In image files: Quality 83 in a JPEG encoder, quality 68 in an AVIF encoder
- In real life: The shop's scale, the same for every bag
- In image files: One quality test, the same for every file
- In real life: The same 100 g of tea
- In image files: The same quality score
- In real life: The price you pay for it
- In image files: The bytes Asha downloads
The course compared formats that way:
- It took two images. The photo is two parrots from the Kodak image suite, which its host says many sites use to test compression. The screenshot is the shop's dashboard, as Chrome drew it.
- It saved each image in all five formats. Then it scored every file with a quality test called SSIMULACRA2. At 80, an average person comparing the file with the original, side by side, wouldn't notice a difference.
- Some formats are lossy: they drop detail you're unlikely to see. For each lossy format, the course kept the lowest quality that still scored 80. So the lossy files look equally good.
- Chrome, Firefox and WebKit, the engine Safari is built on, each tried to show every file.
- Chrome loaded the sale page with the photo in each format 5 times. The link was like a slow 4G phone network: a 150 ms round trip and 1.6 Mbps down. Mbps means megabits per second. A round trip is the time for a message to reach the server and for its answer to come back.
Pick an image and a format. See what the course measured:
- Quality setting83
- Size43.6 kB
- SSIMULACRA2 score80.2
- LCP as the hero, in Chrome700 ms
- Chrome 156 decodes ityes
- Firefox 155 decodes ityes
- WebKit 26.6 decodes ityes
Saved at the lowest quality setting that still scored 80, so it looks as good as the other lossy files. Made with sharp, with mozjpeg. The LCP is the median of 5 loads in Chrome.
The kind of image decides the kind of file. Use lossy for photos, lossless for screenshots and line art, SVG for drawings, and video for animations. Then compare formats at the same measured quality, and send the fewest bytes. Add a fallback for browsers that can't show the newest.
Images and media, in the system design course, plans how a site stores and serves images. This lesson picks the file.
Lossy vs lossless
Why was the PNG so big? Because PNG is lossless: the browser gets back every pixel exactly as it was saved. The PNG standard calls it a format for "the lossless, portable, well-compressed storage of static and animated raster images".
A raster image, like a photo or a screenshot, is a grid of tiny coloured dots: the pixels.
Lossless: every pixel comes back
How can PNG shrink a file and keep every pixel? It packs the pixels with DEFLATE, the method gzip uses. In gzip, Brotli, and Zstandard, that was writing "same as step 3" instead of writing step 3 again. It saves the most when the data repeats.
Start with the photo written out in full. Its host describes these photos as "24 bits per pixel". That's three bytes per pixel, one each for red, green and blue.
// The photo is 768 by 512 pixels. Each pixel is 3 bytes: red, green and blue.const everyPixel = 768 * 512 * 3;const png = 747474; console.log(`Every pixel written out: ${everyPixel} bytes.`);console.log(`As PNG: ${png} bytes, ${((png / everyPixel) * 100).toFixed(1)}% of that.`);- Line 2 works out the size of every pixel written out in full: 768 times 512 pixels, at 3 bytes each.
- Line 3 is the PNG the course made, in bytes.
- Line 5 prints
Every pixel written out: 1179648 bytes. - Line 6 prints
As PNG: 747474 bytes, 63.4% of that.
PNG saved about a third. Now the screenshot, saved the same way:
// The screenshot is 1280 by 800 pixels, 3 bytes each.const everyPixel = 1280 * 800 * 3;const png = 27137; console.log(`Every pixel written out: ${everyPixel} bytes.`);console.log(`As PNG: ${png} bytes, ${((png / everyPixel) * 100).toFixed(1)}% of that.`);- Line 2 works out the screenshot written out in full. It has more pixels than the photo. Line 3 is its PNG.
- Lines 5 and 6 print
Every pixel written out: 3072000 bytes.andAs PNG: 27137 bytes, 0.9% of that.
The bigger image made by far the smaller file. A screenshot has wide areas of one flat colour. It has the same letters again and again. So DEFLATE finds repeats everywhere. A photo is what MDN calls a continuous-tone image. Its colours shade slowly into each other. So neighbouring pixels are seldom exactly the same. A lossless format has to keep every one of those small differences.
Lossy: leave out what the eye barely notices
A lossy format makes a different deal. MDN puts the two side by side. Compression can be lossy, "discarding image data to get much smaller files, or lossless, reproducing the original exactly."
You've just seen a lovely photo. You call a friend to describe it. You don't read out the colour of every feather. You say: "Two parrots, one of them bright red." Your friend gets the picture in a few seconds. They miss tiny details that they'd hardly have noticed anyway.
- In real life: "Two parrots, one of them bright red"
- In image files: A lossy file: the picture's shapes and colours
- In real life: The colour of every single feather, left out
- In image files: Fine detail the encoder throws away
- In real life: Your friend getting the picture in seconds
- In image files: A small file that arrives quickly
The program that saves a file in a format is its encoder. JPEG is, in MDN's words, "currently the most widely used lossy compression format for still images". Its standard is called ITU-T T.81. It shows where the encoder drops detail:
- The encoder cuts the image into small squares of 8 by 8 pixels.
- It turns each square into 64 numbers, using a method called the discrete cosine transform. Each number says how much of one pattern the square holds, from smooth to finely striped.
- It rounds each of the 64 numbers, using a table of step sizes. The standard calls this table a quantization table. Rounding is where the detail is lost.
- It packs the rounded numbers without any further loss.
In the standard's words, the result is "substantial compression" with "high visual fidelity". Fidelity means being true to the original. So the file is much smaller, but still looks like the original. Here is the photo both ways:
// The photo in bytes: lossless PNG, and a JPEG that scored 80 for quality.const png = 747474;const jpeg = 43633; console.log(`The PNG is ${(png / jpeg).toFixed(1)} times the size of the JPEG.`);- Line 2 is the photo as PNG, in bytes.
- Line 3 is the photo as JPEG, at the lowest quality that still scored 80.
- Line 5 divides one by the other. It prints
The PNG is 17.1 times the size of the JPEG.
That's seventeen times the bytes for a difference an average person wouldn't notice side by side. It's also why the vacuum-sealed parcel in gzip, Brotli, and Zstandard didn't shrink. A JPEG has already been squeezed this way.
Now try the same with the screenshot:
// The screenshot in bytes: lossless PNG, and a JPEG that scored 80 for quality.const png = 27137;const jpeg = 37944; console.log(`The JPEG is ${(jpeg / png).toFixed(1)} times the size of the PNG.`);- Lines 2 and 3 are the screenshot as PNG and as JPEG. The JPEG scored 80, like the photo's.
- Line 5 prints
The JPEG is 1.4 times the size of the PNG.
This time the lossy file is the bigger one. MDN's advice: "For screenshots, diagrams, logos, and line art, prefer lossless encoding, as blurring and colored fringes around text and sharp edges are very visible."
Why it matters: save photos in a lossy format. Save screenshots, charts and line art in a lossless one.
Drawings: SVG has no pixels at all
The logo is a third kind of image: a few flat shapes. For those, there's a format that doesn't store pixels.
A friend asks how to make your lemon cake. You could send a photo of the cake, or you could send the recipe. The recipe is a few lines of text. From it, your friend can bake a small cake or a big one. Print the photo as a poster, though, and you'll see the dots it's made of.
- In real life: The recipe: a few lines of steps
- In image files: An SVG: drawing commands
- In real life: Baking a small cake or a big one
- In image files: Drawing the logo at any size
- In real life: The photo of the cake
- In image files: A raster image: a fixed grid of pixels
- In real life: The dots on the poster
- In image files: Pixels stretched bigger than the file holds
SVG, Scalable Vector Graphics, is the recipe. MDN describes it as a format that "specifies the contents of an image as a set of drawing commands that create shapes, lines, apply colors, filters, and so forth." Here is the shop's whole logo:
<svg xmlns="http://www.w3.org/2000/svg" viewBox="0 0 64 64" width="64" height="64"> <rect width="64" height="64" rx="14" fill="#1d6b4f"/> <path d="M18 26h24v10a12 12 0 0 1-24 0z" fill="#fff"/> <path d="M42 29h3a5 5 0 0 1 0 10h-3" fill="none" stroke="#fff" stroke-width="3"/> <path d="M27 21c0-4 4-4 4-8M33 21c0-4 4-4 4-8" fill="none" stroke="#bfe6d4" stroke-width="2.5" stroke-linecap="round"/></svg>- Line 1 starts a drawing. Its
viewBoxsets up a grid of 64 by 64 units to draw on. - Line 2 draws a green square with rounded corners that fills the grid.
- Line 3 draws the cup as a
path, a list of pen moves.M18 26moves the pen, andh24draws 24 units across. - Line 4 draws the cup's handle, and line 5 two curls of steam.
- Line 6 ends the drawing. Choose Edit & run to see it drawn.
The file is 410 bytes. As a 128 by 128 PNG, the logo was 2,165 bytes, more than five times as many. MDN calls SVG ideal for "images which can be accurately drawn at any size." A PNG isn't. Shown any bigger, it has to stretch pixels it doesn't have. The SVG is simply drawn bigger.
Why it matters: logos, icons and simple diagrams belong in SVG. They stay tiny and sharp on every screen.
WebP and AVIF
So the photo should be lossy. But JPEG isn't the only lossy format any more. Two newer ones were built to beat it:
- WebP. web.dev: "Google originally developed WebP as a lossy image format to supersede JPEG, one that was able to produce files smaller than a comparable-quality image file encoded as JPEG." To supersede is to replace.
- AVIF. web.dev: "AV1 Image File Format (AVIF) is an encoding based on the open source AV1 video codec." A codec is a method for compressing and decompressing. AV1 was made for video.
MDN notes that both can also be lossless, have see-through parts, and hold animations.
The photo on the scale
Which makes the smallest photo? Here is the tea on the scale. Every file below scored 80. JPEG XL, from the next section, is in the race too.
// The photo in each lossy format, at the lowest quality that scored 80: [quality, bytes].const photo = { JPEG: [83, 43633], WebP: [89, 47736], AVIF: [68, 30149], "JPEG XL": [78, 30141],}; for (const [format, [quality, bytes]] of Object.entries(photo)) { console.log(`${format}: ${(bytes / 1000).toFixed(1)} kB, at quality ${quality}`);}- Line 1 says what each pair holds. That's the quality setting that reached 80, and the file's size in bytes.
- Lines 3 to 6 are the four formats.
- Lines 9 to 11 print one line per format, in kB: kilobytes of 1,000 bytes, the way DevTools counts.
- The first two lines printed are
JPEG: 43.6 kB, at quality 83andWebP: 47.7 kB, at quality 89. - The last two are
AVIF: 30.1 kB, at quality 68andJPEG XL: 30.1 kB, at quality 78.
AVIF and JPEG XL tied, each 13.5 kB smaller than the JPEG. WebP came last, bigger than the JPEG. That may surprise you. MDN says lossy WebP images are "on average 25–35% smaller than JPEG images of visually similar compression levels". But an average isn't your image. Measure your own.
The screenshot on the scale
Now the screenshot, saved the same way. It tells a different story:
// The screenshot in each lossy format, at the lowest quality that scored 80: [quality, bytes].const screenshot = { JPEG: [81, 37944], WebP: [56, 11794], AVIF: [31, 5872], "JPEG XL": [48, 18820],}; for (const [format, [quality, bytes]] of Object.entries(screenshot)) { console.log(`${format}: ${(bytes / 1000).toFixed(1)} kB, at quality ${quality}`);}- Lines 3 to 6 are the same four formats, made from the screenshot.
- The first two lines printed are
JPEG: 37.9 kB, at quality 81andWebP: 11.8 kB, at quality 56. - The last two are
AVIF: 5.9 kB, at quality 31andJPEG XL: 18.8 kB, at quality 48.
Here every newer format beat JPEG easily, and AVIF was the smallest. For screenshots, MDN still advises lossless, because a blurred letter is easy to spot. Lossless WebP made 11.4 kB, less than half of the PNG's 27.1 kB.
Now look at the quality numbers. To score 80, AVIF needed 68 for the photo and 31 for the screenshot. JPEG needed 83 and 81. Like "Large" on a bag of tea, a quality number only means something inside its own encoder.
Here is every file the course made, in one picture:
Fewer bytes, sooner on screen
Does a difference of a few kilobytes matter to Asha? Here is the sale page's LCP with the photo in each format:
// The photo as the hero in each format, on the slow link: the median LCP of 5 loads, in ms.const lcp = { AVIF: 628, "JPEG XL": 640, JPEG: 700, WebP: 716, PNG: 4212 }; for (const [format, ms] of Object.entries(lcp)) console.log(`${format}: the photo appeared at ${ms} ms`);- Line 2 holds each format's LCP. Each is the median of the 5 loads, in ms.
- Line 4 prints one line per format, from
AVIF: the photo appeared at 628 mstoPNG: the photo appeared at 4212 ms.
The two 30.1 kB files came first, then the JPEG, the WebP and the PNG: the order of their sizes. In The four parts of LCP, a heavy photo made the resource load duration longer. That's the time its bytes spend on the way. A bigger order spends longer in the oven. The link's speed tells you how long:
// The slow link carries 1600 kilobits a second. A byte is 8 bits, so 200 bytes arrive each millisecond.const bytesPerMs = 1600 / 8;const jpeg = 43633;const avif = 30149; console.log(`The JPEG needs ${(jpeg / bytesPerMs).toFixed(1)} ms on the link.`);console.log(`The AVIF needs ${(avif / bytesPerMs).toFixed(1)} ms on the link.`);- Line 2 turns the link's speed into bytes per millisecond. 1600 kilobits a second is 1600 bits each millisecond. And 8 bits make a byte.
- Lines 3 and 4 are the two files' sizes, in bytes.
- Lines 6 and 7 divide each size by the speed. They print
The JPEG needs 218.2 ms on the link.andThe AVIF needs 150.7 ms on the link.
That's 67.4 ms apart, and the recorded LCPs were 72 ms apart. So the bytes explain almost all of it. The PNG's bytes alone need 3,737 ms on this link.
Why it matters: on this link, every kilobyte of the LCP image costs Asha 5 ms.
JPEG XL support
JPEG XL tied with AVIF for the photo. Chrome's team writes that "Chrome is shipping decoding support for the JPEG XL (.jxl) image format starting from Chrome 155". Decoding is turning a file back into pixels. The course asked three engines to decode it:
// Whether each engine decoded the JPEG XL photo, and the file it took from the <picture>.const engines = { "Chrome 156": { jxl: true, picked: "/photo.jxl" }, "Firefox 155": { jxl: false, picked: "/photo.avif" }, "WebKit 26.6": { jxl: true, picked: "/photo.jxl" },}; for (const [engine, { jxl, picked }] of Object.entries(engines)) console.log(`${engine}: ${jxl ? "decodes" : "can't decode"} JPEG XL, shows ${picked}`);- Lines 3 to 5 record what each engine did. Did it decode the JPEG XL file? And which file did it show from a
<picture>? You'll meet that element in a moment. - The first line printed is
Chrome 156: decodes JPEG XL, shows /photo.jxl. - The next two are
Firefox 155: can't decode JPEG XL, shows /photo.avifandWebKit 26.6: decodes JPEG XL, shows /photo.jxl.
Firefox 155 can't show it. And Ravi doesn't know which browser Asha uses. MDN's advice: "Because browser support is not yet universal, provide a fallback using the <picture> element." A fallback is a second choice. It's for when the first can't be used.
You've bought a new cabin bag. It's smaller than your old one and holds just as much. But not every airline accepts it yet. So you bring both to the airport, the new one first. At the desk you hand over the first bag this airline takes. The old bag is accepted everywhere, so you're never stuck.
- In real life: The new, smaller bag
- In HTML: A JPEG XL or AVIF file
- In real life: The old bag that every airline takes
- In HTML: The JPEG in the
<img> - In real life: The airline's list of bags it accepts
- In HTML: The formats this browser can decode
- In real life: Handing over the first bag the airline takes
- In HTML: The browser using the first
<source>it supports
A picture with a fallback
Here is the <picture> the course gave each engine:
<picture>
  <source srcset="/photo.jxl" type="image/jxl">
  <source srcset="/photo.avif" type="image/avif">
  <source srcset="/photo.webp" type="image/webp">
  <img src="/photo.jpg" alt="Two parrots" width="768" height="512">
</picture>- Line 1 opens the
<picture>element. The HTML standard says it "does not display anything". It only offers files to the image inside it. - Line 2 offers the JPEG XL file. Its
typenames the format as a MIME type:image/jxl. A MIME type is the standard name for a kind of file. - Lines 3 and 4 offer the AVIF and the WebP the same way.
- Line 5 is the
<img>, the element on the page, with the JPEG that every browser can show. - Line 6 closes the picture.
The HTML standard says how a browser chooses. It reads the <source> elements in order. Its rule: "If child has a type attribute, and its value is an unknown or unsupported MIME type, continue to the next child." In plain words: skip any file this browser can't show. If none fits, the standard's example says "the img element will be chosen."
That's what the engines did. Firefox skipped the JPEG XL and took the AVIF. Chrome and WebKit took the JPEG XL, the first in the list. So order matters. The browser takes the first file it can show, not the smallest.
Leave out type, though, and there's a trap. The standard warns: "If the type attribute is not specified, the user agent will not select a different source element if it finds that it does not support the image format after fetching it." So a browser would download the first file. If it couldn't decode it, it would fail and stop there.
Why it matters: give every source a type. And always end with an <img> that every browser can show.
AVIF or JPEG XL?
Which should Ravi try? First, two terms. High-fidelity means very close to the original. Progressive decoding shows a rough version of the whole image early. Then it sharpens it as more bytes arrive. Now Chrome's team: "In general, we recommend trying both AVIF and JPEG XL to get the best results. We expect that JPEG XL is most helpful for high-fidelity or lossless compression, especially of photographic images or in cases in which fine-grained progressive decoding is preferred." MDN notes that AVIF "does not support progressive rendering".
JPEG XL has one more trick, for sites full of old JPEGs. To transcode is to convert a file to another format. MDN says JPEG XL "can also losslessly transcode existing JPEG images, allowing the original JPEG file to be reconstructed." Does it work? The course tried two tools from libjxl. Chrome's post calls libjxl "the C++ reference implementation of JPEG XL". That's the official example code for the format. cjxl makes a JPEG XL file. djxl turns one back.
// The photo's JPEG from above, recompressed losslessly with cjxl, then turned back with djxl.const jpeg = 43633;const jxl = 38793;const sameBytesBack = true; console.log(`JPEG XL: ${(jxl / 1000).toFixed(1)} kB, ${Math.round((1 - jxl / jpeg) * 100)}% smaller`);console.log(`back to JPEG: ${sameBytesBack ? "the very same bytes" : "different bytes"}`);- Line 2 is the photo's JPEG from the WebP and AVIF section, in bytes.
- Line 3 is the JPEG XL that cjxl made from it.
- Line 4 records what djxl gave back: exactly the same bytes as the JPEG.
- Lines 6 and 7 print
JPEG XL: 38.8 kB, 11% smallerandback to JPEG: the very same bytes.
Why it matters: a site can shrink its existing JPEGs. None of them looks any different. And each one can still be turned back.
Choosing quality with your eyes and with metrics
Back to Ravi's quality slider. Where should it go? First, what does its number mean?
The office photocopier has a dial to save toner. Turn it down a step, and the copies look just the same, but use less toner. Keep turning, and for a while nobody can tell. Then, quite suddenly, the letters start to break up. The copier next door has a dial too, but its 5 isn't the same as yours.
- In real life: Turning the dial down
- In an encoder: Lowering the quality setting
- In real life: Copies that look the same and use less toner
- In an encoder: Smaller files that look like the original
- In real life: The letters suddenly breaking up
- In an encoder: Artifacts appearing
- In real life: The copier next door, whose 5 isn't yours
- In an encoder: Another encoder's quality scale
The number belongs to the encoder
The JPEG standard leaves the rounding tables to the software. It says: "No default values for quantization tables are specified in this Specification". The course's JPEG encoder is mozjpeg. Its quality number picks a table of step sizes: bigger steps, more rounding, fewer bytes. Its docs say the setting "Constructs JPEG quantization tables appropriate for the indicated quality setting." Other encoders have their own scales. That's why JPEG's 83 and AVIF's 68 both scored 80.
A score for what people see
To know what a setting really did, measure the result with a metric. A metric is a test that gives a number. SSIMULACRA2 compares a file with its original. Its README says the score "correlates to subjective visual quality scores". That means it predicts what people would say.
Its scores talk about artifacts: the marks lossy compression leaves behind. The blurring and coloured fringes MDN warned about for screenshots are artifacts. MDN calls them "side effects of a lossy encoding process in which the lost or rearranged data results in visibly negative effects." Here is how the README describes four scores:
- 30: "Obvious and annoying artifacts." It calls this "low quality".
- 50: "Slightly annoying artifacts." It calls this "medium quality".
- 70: "Artifacts are perceptible, but not annoying." It calls this "high quality".
- 80: "Distortion not noticeable by an average observer in a side-by-side comparison at 1:1 from a normal viewing distance." It calls this "very high quality".
Here is the photo as JPEG at nine settings, each one scored:
// The photo as JPEG at each quality: [bytes, SSIMULACRA2 score].const ladder = { 20: [10399, 23.1], 30: [14122, 42.1], 40: [17635, 53.3], 50: [20757, 60.7], 60: [24186, 65.8], 70: [29326, 71.4], 80: [39491, 78.1], 90: [61451, 84.3], 95: [92229, 87.5],}; for (const [quality, [bytes, score]] of Object.entries(ladder)) console.log(`q${quality}: ${(bytes / 1000).toFixed(1)} kB, score ${score}`);- Lines 3 to 11 are the nine settings. Each holds the file's size in bytes and its score.
- Line 14 prints one line per setting, from
q20: 10.4 kB, score 23.1toq95: 92.2 kB, score 87.5.
Read the bars from the top. From q20 to q70, the file grew by 18.9 kB, and the score jumped 48.3 points. It went past "low" and "medium" to "high". From q80 to q90, the file grew by 22.0 kB, and the score rose just 6.2 points. That's the toner dial. At low settings, each step buys a lot. At high settings, each step costs more and buys less.
Then look for yourself
A metric gets you close. Then use your eyes. Here is the red parrot's eye at three settings, next to the original:
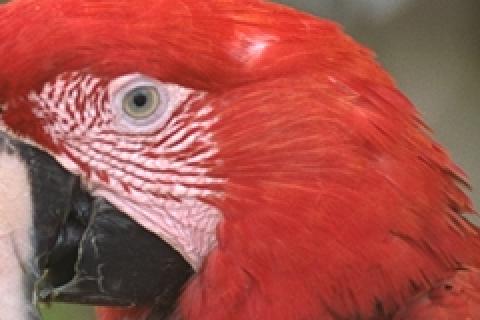 The original, lossless
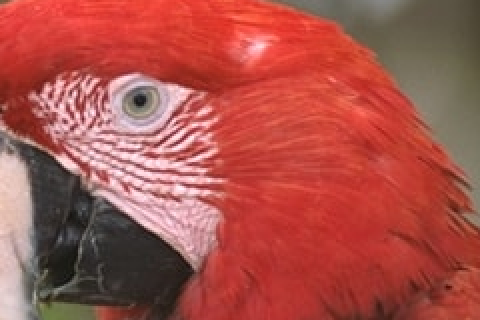 JPEG quality 90: 61.5 kB, score 84.3
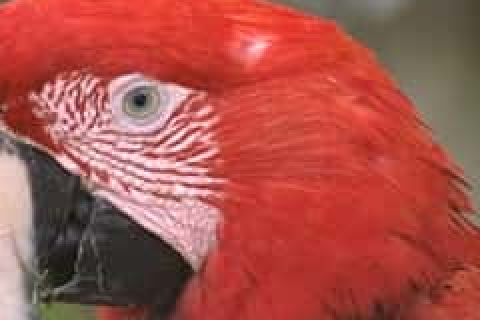 JPEG quality 60: 24.2 kB, score 65.8
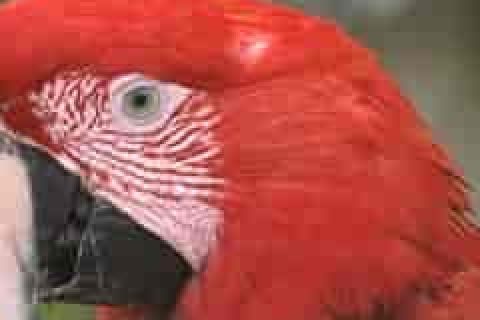 JPEG quality 30: 14.1 kB, score 42.1
Look closely at the feathers around the eye. At quality 30 they've melted into flat, blotchy patches. The edge of the beak looks blocky. At 60 the feathers are softer than in the original. At 90 it's hard to tell them from the original.
Ravi doesn't need to do this for every photo. Check a few images of each kind your site has. Pick one setting per kind and format. Then let your build tool apply it. Why it matters: the last few points of quality cost the most bytes. And on the LCP image, bytes are time.
Replacing GIFs with video
The last image on Ravi's list moves. It's a 3-second banner that slowly zooms into the photo, 480 by 320 pixels. It's saved as an animated GIF. web.dev warns: "Animated GIFs can be downright huge." The course checked. It made the animation. Then web.dev's commands made two videos from it, MP4 and WebM:
// The 3-second animation as a GIF, and as video from web.dev's commands, in bytes.const gif = 4233576;const video = { MP4: 90010, WebM: 28708 }; console.log(`GIF: ${(gif / 1000).toFixed(1)} kB`);for (const [format, bytes] of Object.entries(video)) console.log(`${format}: ${(bytes / 1000).toFixed(1)} kB, ${Math.round(gif / bytes)}× smaller`);- Line 2 is the GIF, in bytes. Line 3 holds the two videos.
- Line 5 prints
GIF: 4233.6 kB. - Line 6 prints
MP4: 90.0 kB, 47× smallerandWebM: 28.7 kB, 147× smaller.
That's over 4 MB for 3 seconds of a slow zoom. At 200 bytes a millisecond, Asha's link needs 21.2 seconds for the GIF, and 143.5 ms for the WebM.
Why such a gap? The two store moving pictures differently:
- A GIF is lossless, with at most 256 colours. MDN explains what comes after the first frame. The GIF stores "a series of images reflecting the parts of the image that change with each frame". In a zoom, the whole picture moves every frame.
- A video stores changes instead. MDN's video guide: "Compression of video generally works by comparing two frames and recording the differences between them". It can also record that something moved, and how far. That's the "same as step 3" note again, between pictures.
A video that behaves like a GIF
web.dev makes a video act like a GIF with this markup:
<video autoplay loop muted playsinline> <source src="my-animation.webm" type="video/webm"> <source src="my-animation.mp4" type="video/mp4"></video>- Line 1 has four attributes. They copy what a GIF does. web.dev: a video with them "plays automatically, loops endlessly, plays no audio, and plays inline". Inline means inside the page, not full screen.
- Lines 2 and 3 offer the WebM, then the MP4. Like a
<picture>, the browser takes the first one it can play. web.dev: "Browsers don't speculate about which <source> is optimal, so the order of <source>'s matters." - Line 4 closes the video.
One of web.dev's commands didn't work as given. With ffmpeg 9.0.2, web.dev's WebM command stopped with an error about the GIF's pixel format. A pixel format is the way each pixel's colour is stored. Adding the MP4 command's -pix_fmt yuv420p fixed it:
ffmpeg -i my-animation.gif -b:v 0 -crf 25 -f mp4 -vcodec libx264 -pix_fmt yuv420p my-animation.mp4
ffmpeg -i my-animation.gif -c vp9 -b:v 0 -crf 41 my-animation.webm
# Pixel format 'gbrap' is not widely supported. ...
ffmpeg -i my-animation.gif -c vp9 -b:v 0 -crf 41 -pix_fmt yuv420p my-animation.webm- Line 1 is web.dev's MP4 command.
-inames the input file, and-pix_fmt yuv420psets the pixel format of the video. - Line 2 is web.dev's WebM command, as given.
- Line 3 is the start of the error ffmpeg printed for it.
- Line 4 is the same WebM command with
-pix_fmt yuv420padded. That one worked.
All three engines played both videos. Why it matters: turn animated GIFs into video, and check what a copied command really made.
Which format?
Here are the raster formats from this lesson in one table. Each row is one format. Read across: what it keeps, whether it can have see-through parts, and what MDN suggests it for. A pixel's alpha channel is the part that says how see-through it is.
| Format | What does it keep? | Can parts be see-through? | What does MDN suggest it for? |
|---|---|---|---|
| JPEG | Lossy only. | No. JPEG has no alpha channel. | Photos, and as the fallback for them. |
| PNG | Lossless. | Yes. | Screenshots, diagrams and line art, and as the fallback for see-through images. |
| WebP | Lossy or lossless: you choose when you save. | Yes. | Both still and animated images. |
| AVIF | Lossy or lossless: you choose when you save. | Yes. | Both still and animated images, with a fallback. |
| JPEG XL | Lossy or lossless: you choose when you save. | Yes. | Large, high-resolution images, with a fallback. |
| GIF | Lossless, with at most 256 colours. | One colour can be fully see-through. | Simple images and animations. For still images, MDN prefers PNG. |
Now sort Ravi's images, and a few more. What kind of file should each one be?
- The shop's logo, a few flat shapes
- A set of icons for the shop's menu
- A screenshot of the sales dashboard
- A chart exported as an image, with thin lines
- A product photo as the LCP image
- Customers' photos in a gallery
- An animated product demo, now a GIF
- A silent looping background animation
Sort each image by the kind of file it should be.
Common mix-ups
- "WebP is always smaller than JPEG." No. At the same score, the photo was 47.7 kB as WebP and 43.6 kB as JPEG. MDN's 25–35% is an average over many images.
- "Quality 80 means the same in every format." No. Each encoder has its own scale. To score 80, the photo needed quality 83 in JPEG and 68 in AVIF.
- "PNG is the high-quality choice for photos." No. It keeps every tiny difference between pixels, so the photo was 747.5 kB. As the hero, it appeared at 4,212 ms, against 700 ms as a JPEG.
- "JPEG XL works nowhere yet." No. Chrome 156 and WebKit decoded it. Firefox 155 didn't, so serve it in a
<picture>with a fallback. - "Turning a GIF into video is one copied command." No. web.dev's WebM command failed as given with this ffmpeg.
Practice exercises
Answer first, then use the hints.
This is the photo example from the WebP and AVIF section, with one line added at the end. What does that last line print?
// The photo in each lossy format, at the lowest quality that scored 80: [quality, bytes].
const photo = {
  JPEG: [83, 43633],
  WebP: [89, 47736],
  AVIF: [68, 30149],
  "JPEG XL": [78, 30141],
};

for (const [format, [quality, bytes]] of Object.entries(photo)) {
  console.log(`${format}: ${(bytes / 1000).toFixed(1)} kB, at quality ${quality}`);
}
console.log(`AVIF saves ${Math.round((1 - photo.AVIF[1] / photo.JPEG[1]) * 100)}% on the photo`);AVIF saves 31% on the photo. 30,149 bytes is about 69% of 43,633, so AVIF saves the other 31%, at the same score.
This is the quality ladder, with three lines added at the end. What does the last line print?
// The photo as JPEG at each quality: [bytes, SSIMULACRA2 score].
const ladder = {
  20: [10399, 23.1],
  30: [14122, 42.1],
  40: [17635, 53.3],
  50: [20757, 60.7],
  60: [24186, 65.8],
  70: [29326, 71.4],
  80: [39491, 78.1],
  90: [61451, 84.3],
  95: [92229, 87.5],
};

for (const [quality, [bytes, score]] of Object.entries(ladder)) console.log(`q${quality}: ${(bytes / 1000).toFixed(1)} kB, score ${score}`);
const [bytes90, score90] = ladder[90];
const [bytes95, score95] = ladder[95];
console.log(`90 → 95: ${(bytes95 / bytes90).toFixed(1)}× the bytes for ${(score95 - score90).toFixed(1)} more points`);90 → 95: 1.5× the bytes for 3.2 more points. Half as many bytes again, for 3.2 points: the top of the dial costs the most.
Use the playground. For the photo saved as WebP, what SSIMULACRA2 score did the file reach?
81.5. Quality 89 was the lowest setting that reached 80, and it landed a little above it.
Use the playground. What SSIMULACRA2 score did the PNG files reach?
100. A lossless file is identical to the original, so there's nothing for the score to mark down.
In which programming language is Chrome's JPEG XL decoder written?
Rust. Chrome's JPEG XL decoder is jxl-rs, which the post calls a pure Rust implementation, chosen for memory safety.
Which SSIMULACRA2 score does its README call "visually lossless"?
90: "visually lossless". The README says that at 90, an average observer doesn't notice the distortion even in a flicker test.
Check your understanding
For each question, ask what kind of image it is, which browsers must show it, and whether the files are being compared at the same quality.
Question 1 of 7What does this screenshot example print?
Read the code, then predict// The screenshot in bytes: lossless PNG, and a JPEG that scored 80 for quality. const png = 27137; const jpeg = 37944; console.log(`The JPEG is ${(jpeg / png).toFixed(1)} times the size of the PNG.`);Choose an answer to see the explanation.
Question 2 of 7What does the third line of this screenshot example print?
Read the code, then predict// The screenshot in each lossy format, at the lowest quality that scored 80: [quality, bytes]. const screenshot = { JPEG: [81, 37944], WebP: [56, 11794], AVIF: [31, 5872], "JPEG XL": [48, 18820], }; for (const [format, [quality, bytes]] of Object.entries(screenshot)) { console.log(`${format}: ${(bytes / 1000).toFixed(1)} kB, at quality ${quality}`); }Choose an answer to see the explanation.
Question 3 of 7Why can't you compare formats by their quality numbers?
Choose an answer to see the explanation.
Question 4 of 7A <picture> lists JPEG XL, then AVIF, then WebP, with a JPEG <img>. Which file did Firefox show?
Choose an answer to see the explanation.
Question 5 of 7A <source> in a <picture> has no type attribute, and the browser can't decode its file. What happens?
Choose an answer to see the explanation.
Question 6 of 7The course turned the photo's JPEG into a JPEG XL without loss. What happened?
Choose an answer to see the explanation.
Question 7 of 7Why turn an animated GIF into a video?
Choose an answer to see the explanation.
Key takeaways
- Photos: a lossy format. Screenshots and line art: lossless. Logos and icons: SVG. Animations: video.
- Compare formats at the same measured quality, then by bytes. A quality number only means something inside its encoder.
- AVIF and JPEG XL made the smallest photo here. Offer them in a
<picture>, each with a type, newest first and a JPEG last. - Choose quality with a metric, then check with your eyes. The last few points cost the most bytes.
- Turn animated GIFs into WebM and MP4, and check what copied commands really make.
Remember the one-liner.
The same quality first, then the fewest bytes, with a fallback.
Sources
The facts on this page come from these standards and docs:
- Kodak Lossless True Color Image Suite, Rich Franzen.
- Portable Network Graphics (PNG) Specification (Third Edition), W3C.
- Image file type and format guide, MDN.
- T.81: Digital compression and coding of continuous-tone still images (JPEG), ITU-T.
- Image formats: WebP, web.dev.
- Image formats: AVIF, web.dev.
- Shipping JPEG XL in Chrome, Chrome for Developers.
- The picture element, the HTML Standard.
- Updating the source set, the HTML Standard.
- libjpeg.txt: jpeg_set_quality, mozjpeg on GitHub.
- SSIMULACRA 2, Cloudinary on GitHub.
- Web video codec guide, MDN.
- Replace animated GIFs with video for faster page loads, web.dev.
- ffmpeg Documentation, FFmpeg.
Coming next: Responsive images, also in Loading content fast: LCP. The hero here was saved 768 pixels wide and shown 640 wide. The next lesson sends each screen the size it needs, with srcset, sizes and picture.